Do you have a great idea or invention and can’t shell out the big bucks to make a plastic injection mold? Interested in molding your invention prototype for less?
For nearly every volume production process, there’s a relatively low-cost prototyping process. You can prototype an injection molded part in a couple of ways. Powdered plastic can be fused solid using a 3D CAD-CAM program (computer assisted design-computer aided manufacturing). Or you can make your own silicone rubber mold and cast a two-part plastic resin at room temperature.
The fused powder process is known as FDM (fused deposition modeling). First, a 3D drawing is made using a computer. The drawing is amended to drive a laser beam, which scans the powder layer by layer, and builds up the 3D prototype. Each layer is about two human hairs thick. The equipment is expensive, and this translates into a prototype that may cost several hundred dollars, maybe even a few thousand dollars for a part the size of a football.
Using the silicone rubber mold process, on the other hand, you can mold one, 10, or even 100 parts for the same price once you’ve got the mold. The catch is that you need a master from which to make the mold. The master can be made by the FDM process, by stereolithography (which is similar to FDM but uses a liquid plastic hardened by an ultraviolet laser beam), or by machining from metal, plastic or even wood.
The silicone rubber mold is made in two steps. The master is propped up or suspended by string half an inch or so above the bottom of a container. Plastic refrigerator containers are excellent for this purpose. The silicone consists of a two-part mix that is about the consistency of honey. The mix is poured halfway up the master and allowed to cure overnight. Mold release is then applied to the exposed surface of the silicone. (Silicone won’t stick to anything but itself, which it does very well if you forget the release.) Ordinary Vaseline works great.
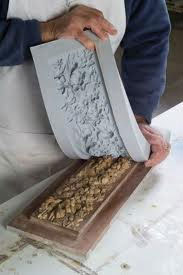
After the second pour is cured, the mold halves are separated, the master removed and passages for the plastic resin input and air output are carved as simple grooves on half of the mold. The mold can then be put back together and secured using a few rubber bands. It helps to carve a few cone-shaped depressions in the cured bottom half of the mold before pouring the top half. These depressions “key” the two mold halves together and eliminate mismatch. The two-part plastic resin is then mixed and poured into the mold, channeled by the input groove to enter from the bottom and “wash” the air toward the top. The plastic cures overnight, and after cutting off the plastic that filled the grooves, you’ll have a part that looks like it came from a much more expensive mold.